
Ever finish a busy day and wonder what you actually accomplished?
You answered emails, replied to messages, attended meetings, and maybe even started a few tasks. But by the end of the day, your to-do list somehow feels longer than when you started.
If that sounds familiar, you’re not alone.
Many people don’t struggle because they have too much work—they struggle because their tasks are scattered across notebooks, sticky notes, phone apps, and their own memory.
That’s where Trello can make a real difference.
A simple Trello board gives you one place to plan your day, track progress, and focus on what matters most. The best part? You can build a practical daily task board in about 10 minutes, even if you’ve never used Trello before.
In this guide, I’ll show you exactly how to create a Trello board for daily tasks, explain why it works so well, and share a few tips I’ve learned from using Trello to manage both personal projects and client work.
What Is a Trello Board?
A Trello board is a visual workspace where you organize tasks using lists and cards.
Think of it as a digital whiteboard.
Each list represents a stage of your workflow, while every card represents an individual task.
For example:
- To Do
- In Progress
- Completed
As you finish work, you simply drag each card from one list to the next.
It’s simple, visual, and surprisingly satisfying.
Why Use Trello for Daily Tasks?
Many task management apps become complicated after a few weeks.
Trello stays simple.
Instead of hiding tasks inside menus, everything is visible on one screen.
Benefits include:
- Quickly see everything you need to do
- Prioritize important work
- Reduce mental clutter
- Stay motivated by moving completed tasks
- Access your tasks from any device
One thing I appreciate most is that Trello doesn’t force a complicated system. You can start with three lists today and improve your workflow over time.
What You’ll Build
By the end of this tutorial, your board will include:
- ✅ Today’s Tasks
- 🔄 In Progress
- ✔ Completed
You can later customize it with labels, due dates, checklists, and automation.
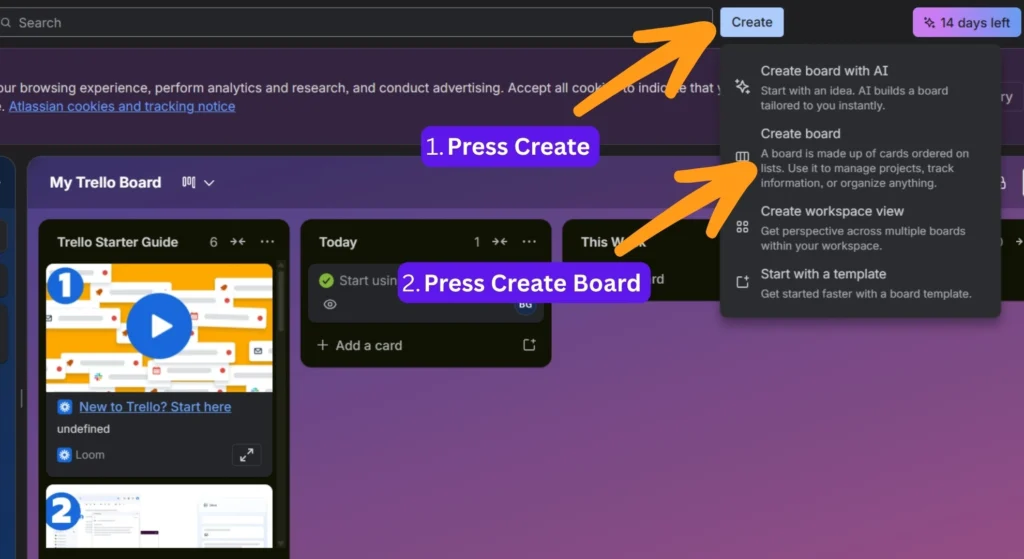
Step 1: Create a New Trello Board
Sign in to your Trello account.
Click the Create button and select Create Board.
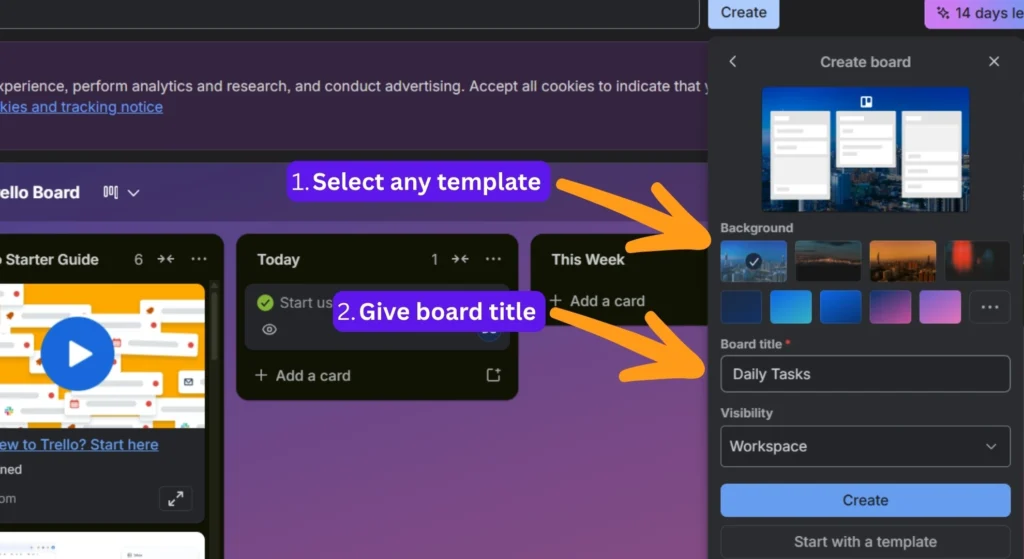
Choose a name like:
Daily Tasks
Pick a background color or image that isn’t distracting.
Click Create.
1. First do this
2. Now follow these steps
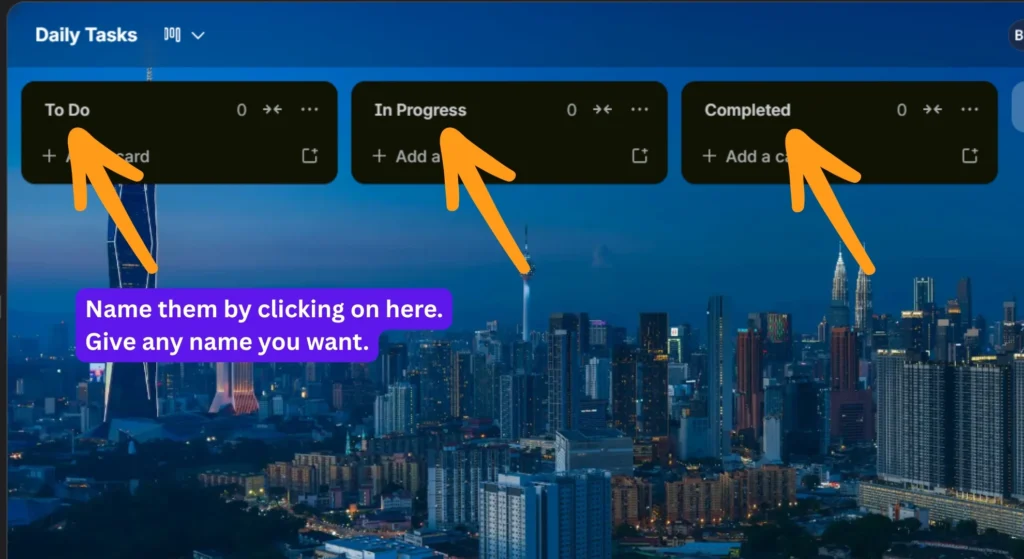
Step 2: Create Your Lists
Lists are the foundation of your workflow.
For beginners, keep it simple.
Create these three lists:
- To Do
- In Progress
- Completed
You can always add more later.
Step 3: Add Task Cards
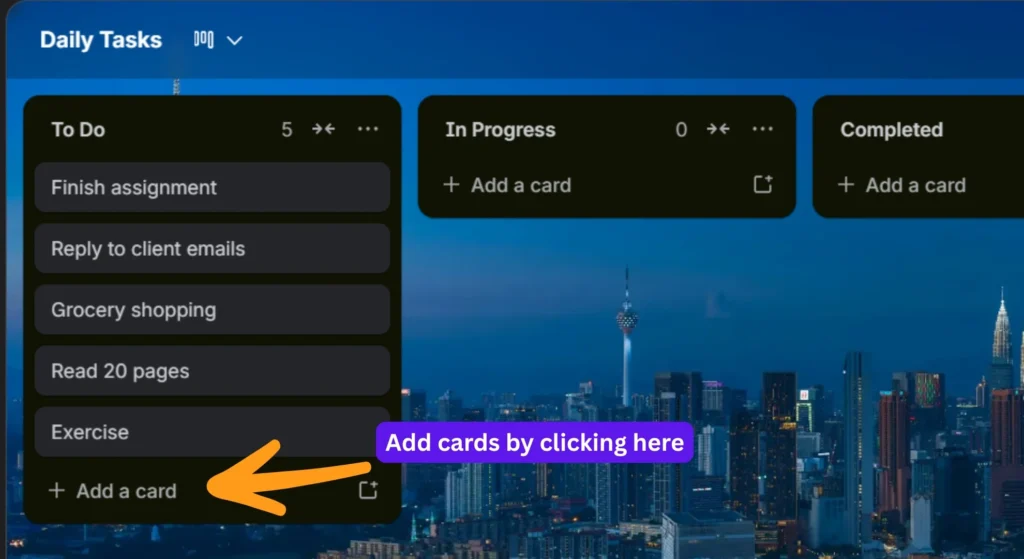
Now it’s time to add your daily tasks.
Examples:
- Finish assignment
- Reply to client emails
- Grocery shopping
- Read 20 pages
- Exercise
- Pay electricity bill
Each task gets its own card.
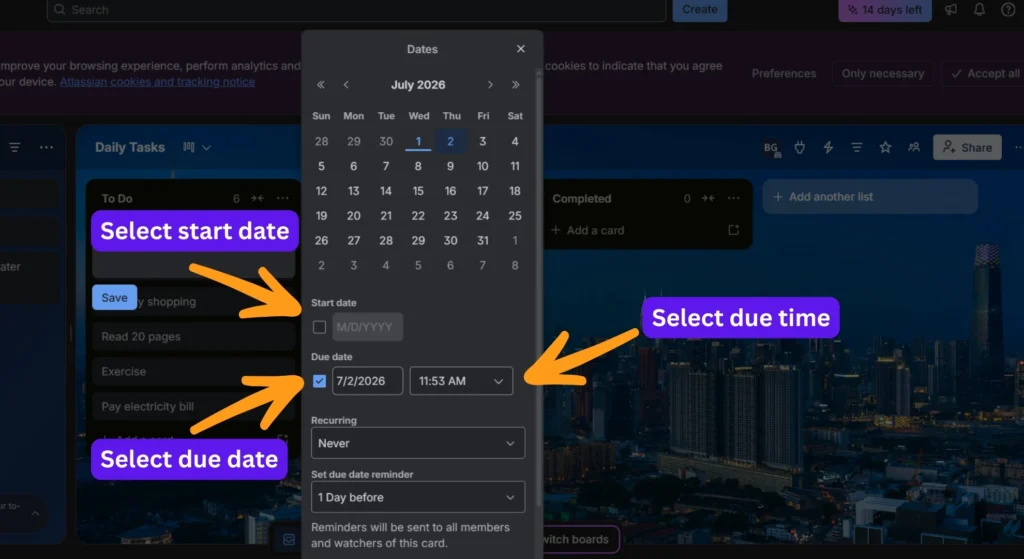
Step 4: Add Due Dates
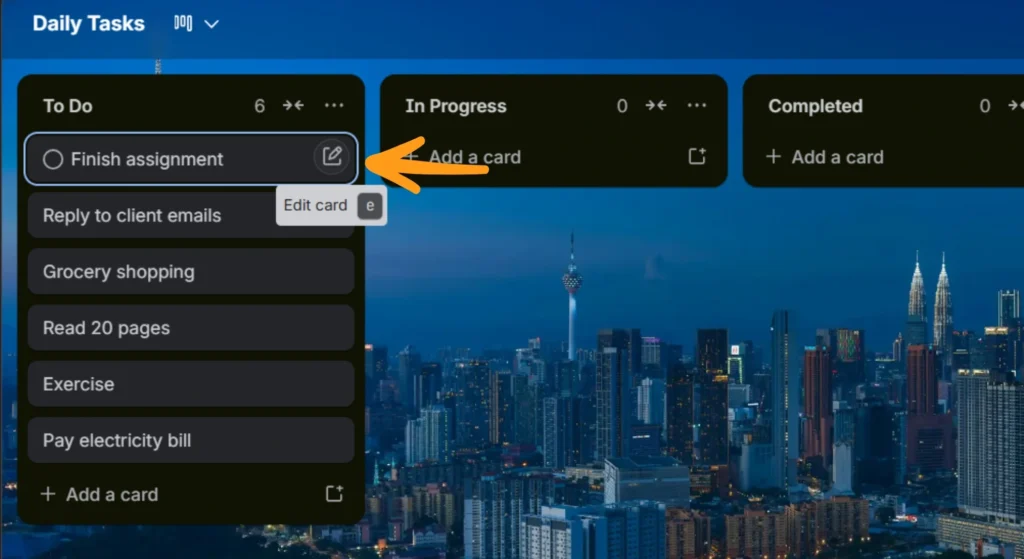
Click any card.
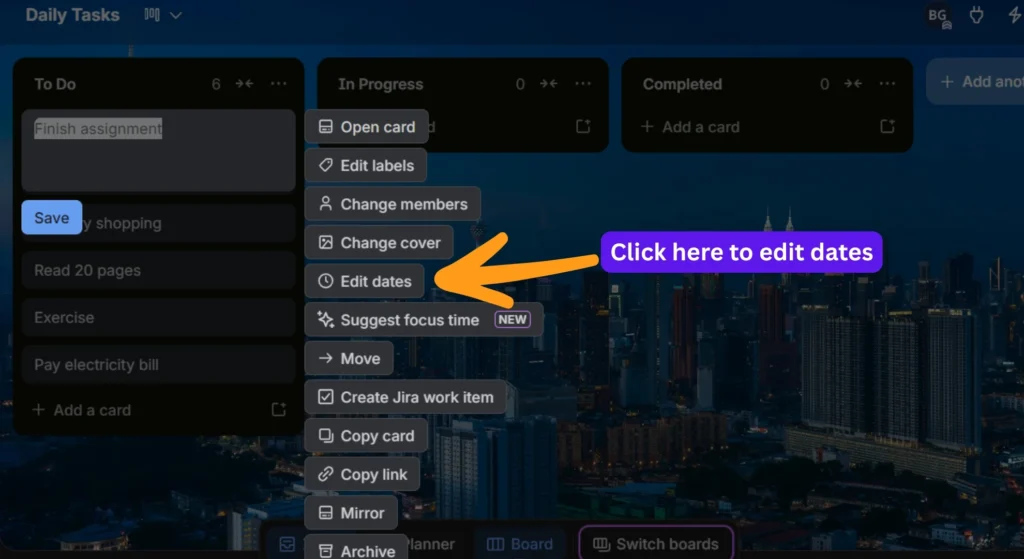
Select Dates.
Choose the deadline.
This helps you avoid forgetting important work.
Trello also highlights overdue tasks, making them easier to notice.
1. Edit the card by clicking here
2. Then go here to edit dates
3. Then set start date and a due date as below
Step 5: Use Labels
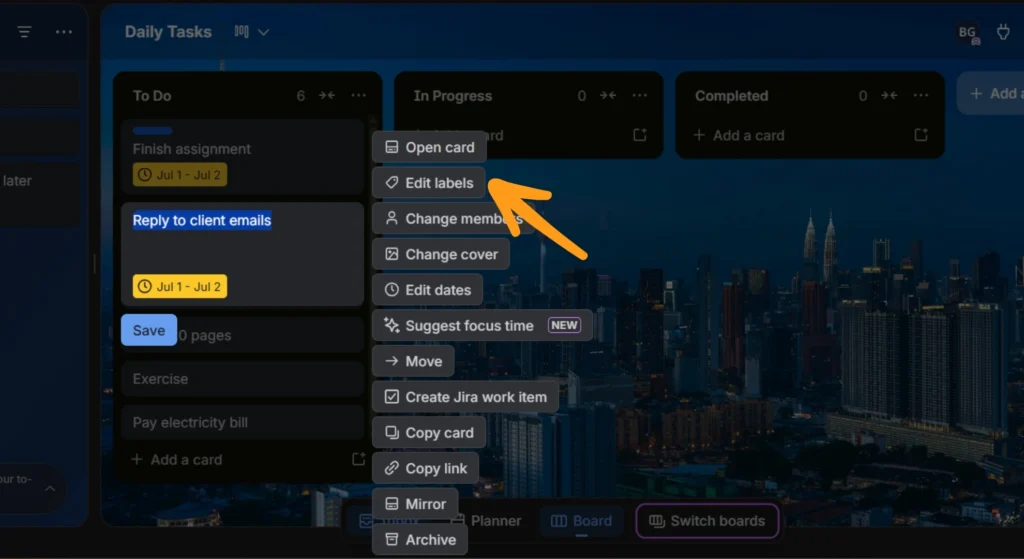
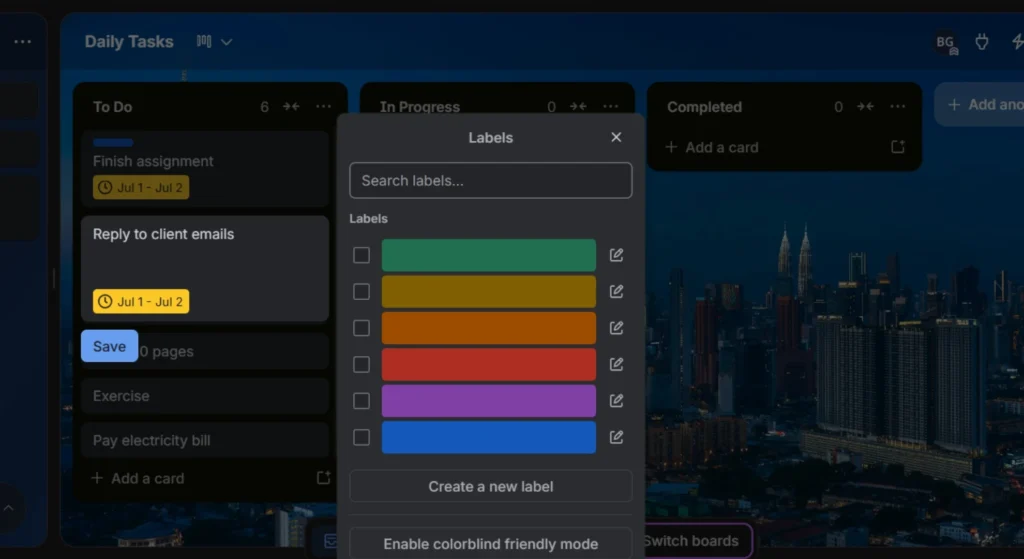
Labels help you identify different types of work instantly.
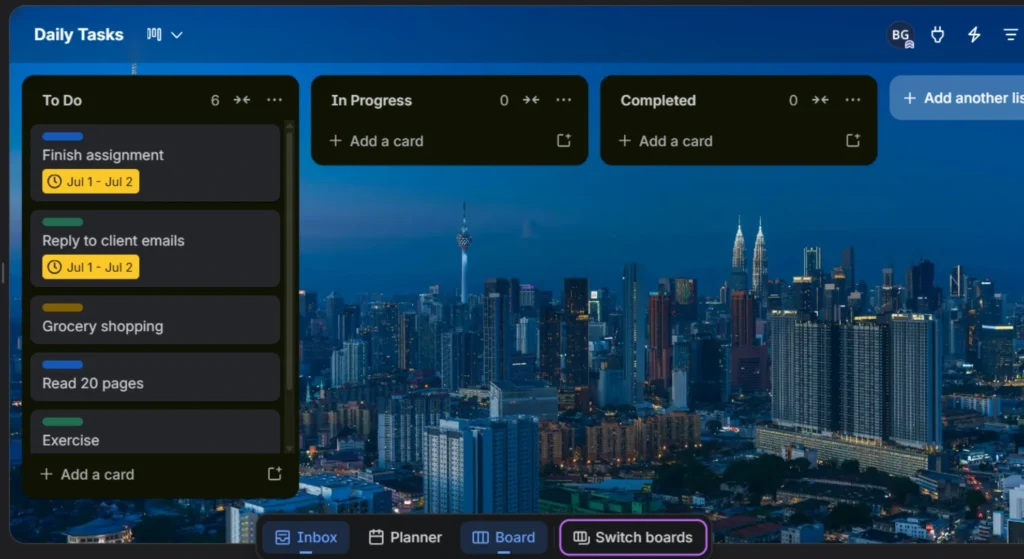
Example:
🟢 Personal
🔵 Study
🟠 Work
🔴 Urgent
Instead of reading every card, you immediately know what category it belongs to.
1. Select edit labels by clicking on it
2. Select colors from here and It will added to the lable
After added the colors, it will look like below
Step 6: Create Checklists
Some tasks involve multiple steps.
Instead of creating several cards, open a card and add a checklist.
Example:
Assignment
- Research topic
- Write introduction
- Complete draft
- Proofread
- Submit
Watching the progress bar fill up is surprisingly motivating.
1. First do this
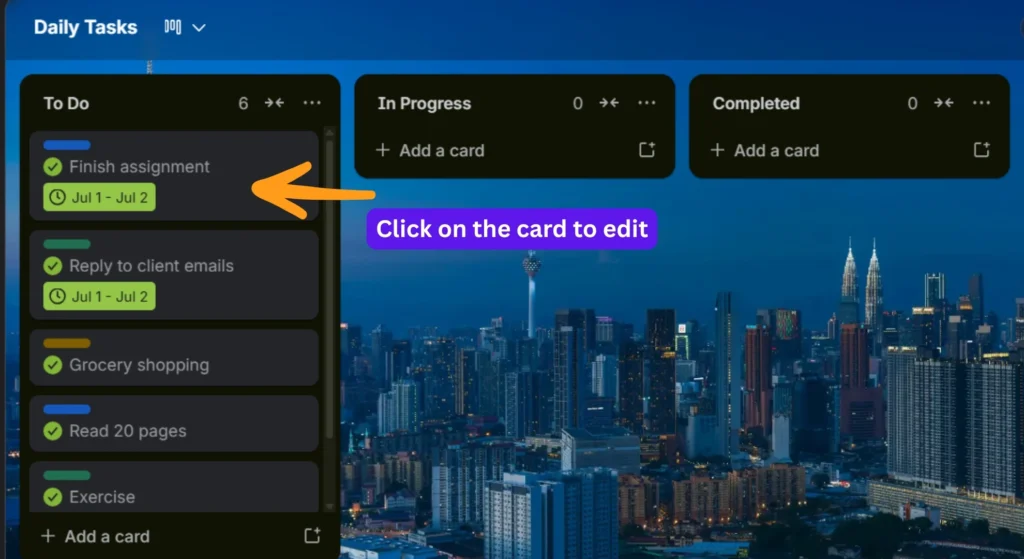
2. Then it will open this window and select checklist
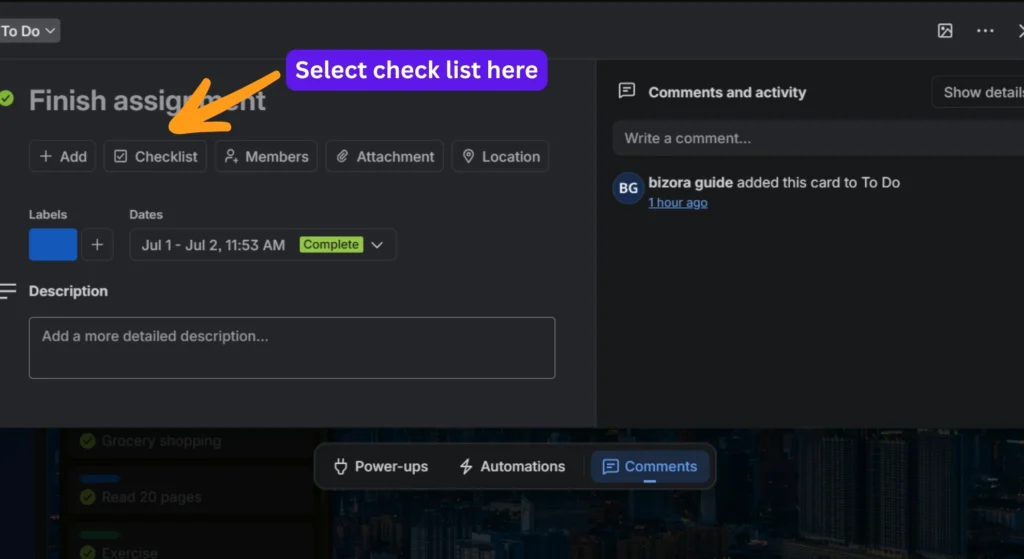
3. Then follow the below instructions as in the image to add checklist items
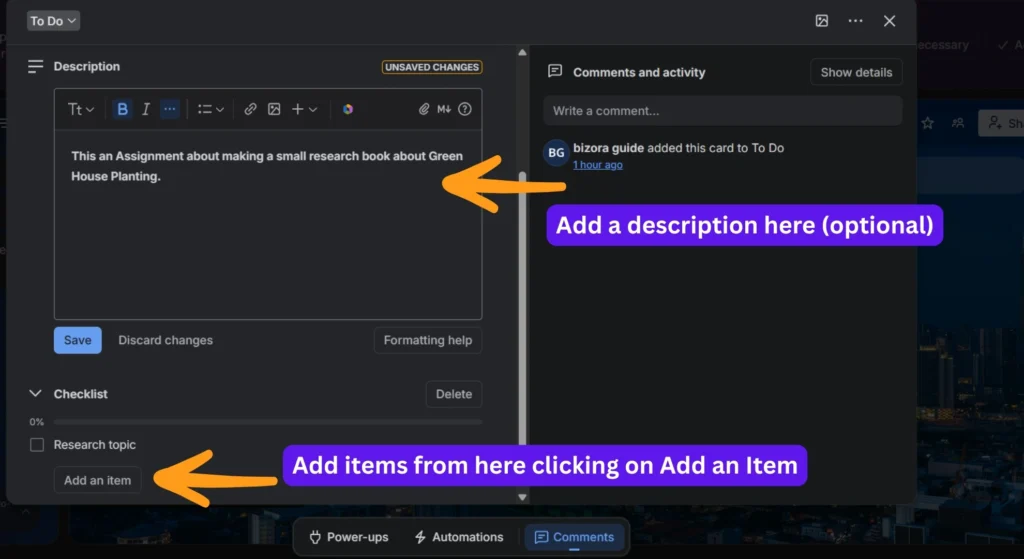
4. After adding list items, click on the items to see the progress bar updates
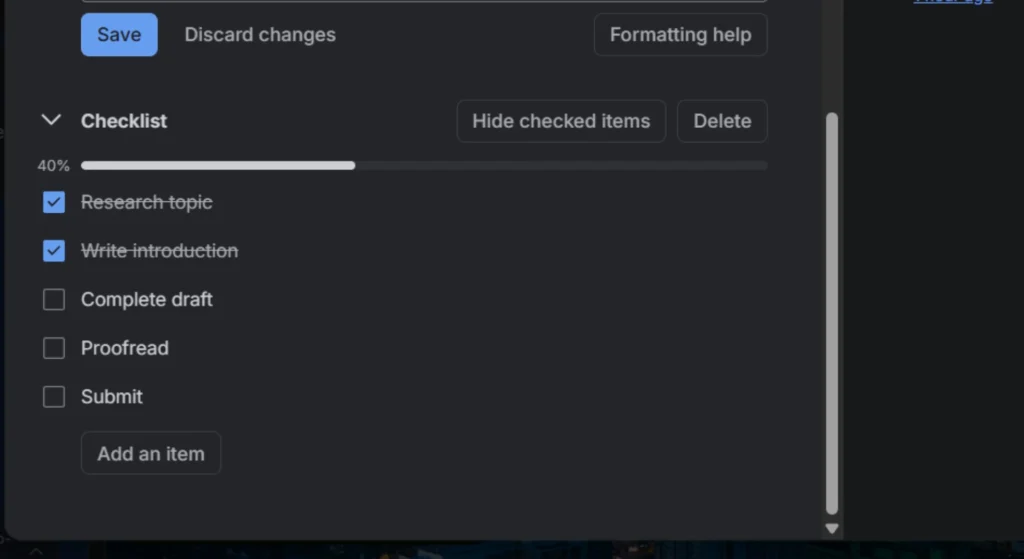
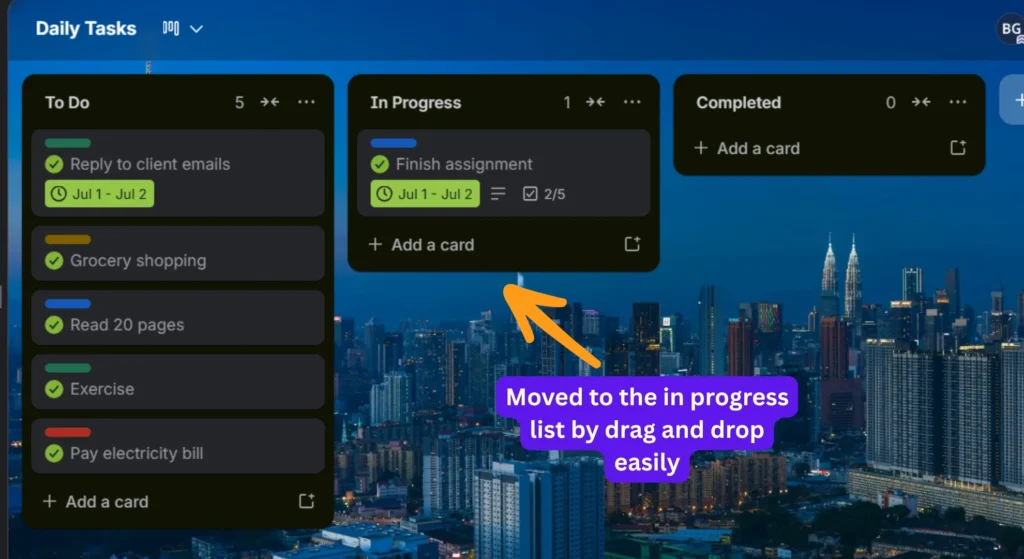
Step 7: Move Cards as You Work
This is where Trello becomes satisfying.
Start working on a task?
Drag it into In Progress.
Finished?
Move it into Completed.
Those small movements provide visual feedback that keeps you motivated throughout the day.
Practical Use Case
Imagine you’re a university student.
Tomorrow you need to:
- Attend two lectures
- Finish an assignment
- Revise for an exam
- Buy groceries
- Exercise
Instead of trying to remember everything, you create one Trello board.
Morning:
- Assignment → In Progress
Afternoon:
- Assignment → Completed
Evening:
- Exercise → Completed
At the end of the day, you can clearly see what you’ve achieved instead of wondering where your time went.
The same approach works equally well for freelancers managing client work or business owners organizing daily operations.
Common Mistakes to Avoid
Many beginners make these mistakes.
1. Adding Too Many Lists
Five to seven lists might look productive, but they often create confusion.
Start with three.
2. Making Cards Too Large
Keep task titles short.
Instead of:
“Complete everything related to marketing”
Write:
“Design Instagram post”
3. Never Archiving Completed Tasks
If completed cards pile up for months, your board becomes messy.
Archive old cards regularly.
4. Ignoring Due Dates
Deadlines only help if you actually set them.
5. Trying to Plan an Entire Month
Focus on today and this week.
Large boards become overwhelming.
6. Forgetting to Review the Board
Spend two minutes every morning checking priorities.
7. Not Using Mobile
Install Trello on your phone so you can update tasks anywhere.
Pro Tips
Keep Your Board Simple
Simple systems are easier to maintain.
Limit Work in Progress
Try to work on only two or three active tasks at a time.
You’ll finish more.
Use Keyboard Shortcuts
Learning a few shortcuts makes Trello much faster.
Review Every Evening
Ask yourself:
- What did I finish?
- What should move to tomorrow?
Create Templates
If your daily routine rarely changes, duplicate yesterday’s board instead of rebuilding it.
Frequently Asked Questions
1. Is Trello free?
Yes. Trello offers a generous free plan that is sufficient for most students, freelancers, and individuals.
2. Can I use Trello on my phone?
Yes. Trello works on Android, iPhone, tablets, and desktop computers.
3. Is Trello good for students?
Absolutely. It’s excellent for assignments, study schedules, and project management.
4. Can I share my board with others?
Yes. You can invite teammates, classmates, or clients to collaborate.
5. What’s the best Trello board for beginners?
A simple board with To Do, In Progress, and Completed lists is the best place to start.
6. How many tasks should I add each day?
Aim for 5–10 realistic tasks rather than an overwhelming list of 30.
7. Can Trello replace a paper planner?
For many people, yes. It offers reminders, collaboration, and access across devices.
8. Does Trello work offline?
The mobile app supports limited offline functionality, but you’ll need an internet connection for full synchronization.
9. Should I create multiple boards?
Use one board for daily tasks initially. Create additional boards only when you need to separate work, study, or personal projects.
10. Is Trello better than a traditional to-do list?
It depends on your workflow. Trello’s visual layout makes it easier to track progress, prioritize tasks, and manage larger projects than a simple checklist.
Free AI Tools That Actually Save Time Every Day
Final Thoughts
Creating a Trello board for daily tasks doesn’t require hours of planning or complicated productivity systems. In just 10 minutes, you can build a simple workflow that helps you stay organized, reduce stress, and focus on completing meaningful work.
The key isn’t creating the perfect board, it’s creating one you’ll actually use.
Start with three lists, add today’s tasks, and move each card as you make progress. Over time, you can add labels, checklists, due dates, and automation to match your workflow.
Remember, productivity isn’t about doing more. It’s about making sure the right things get done.
Your Trello board is simply the tool that helps you get there.
External Resources
- Trello Guide
- Getting Started with Trello
- Trello Templates