

Here’s something most Trello users don’t realize: the automation feature has been sitting in their board this whole time, quietly unused, while they manually drag cards, add labels, and remind teammates about deadlines that Trello could have handled by itself.
Trello’s automation tool called Butler isn’t hidden. It’s just easy to ignore because the default board setup doesn’t push you toward it. Most people learn Trello as a drag-and-drop tool and never discover it can also run logic in the background, quietly doing the repetitive parts of board management for you.
This isn’t about turning your board into some complex, over-engineered machine. It’s about identifying the five or six actions you do manually, every single week, and letting Trello do them instead.
What Butler Automation Actually Does
Butler runs on simple “when this happens, do that” logic. You set a trigger, a card moves to a list, a due date arrives, a checklist is completed and Trello performs an action automatically: adding a label, assigning a member, moving the card, posting a comment, or sending a notification.
The free plan includes a monthly allotment of automation runs enough for individuals and small teams to build a genuinely useful system without hitting a paywall. Paid plans raise that limit for larger teams running automations at scale.
The mental shift that matters here: automation isn’t for complicated workflows. It’s most valuable for the boring, repetitive actions that eat small amounts of time constantly, the kind of thing you don’t notice costing you anything, until you add it up over a month.
The Cost of Not Automating (More Than You’d Think)
| Manual Action | Time Per Instance | Frequency | Monthly Time Cost |
|---|---|---|---|
| Moving cards between lists | 10 seconds | 20x/week | ~13 minutes |
| Adding labels manually | 8 seconds | 25x/week | ~13 minutes |
| Assigning members to new cards | 15 seconds | 15x/week | ~15 minutes |
| Checking and flagging overdue cards | 3 minutes | Weekly | 12 minutes |
| Sending status update messages | 5 minutes | Weekly | 20 minutes |
| Archiving completed cards | 2 minutes | Weekly | 8 minutes |
None of these look expensive individually. Added up over a month, that’s well over an hour of pure repetitive clicking, time that automation converts into zero.
Building Your First Automation Rules
Rule Type 1 – Trigger by Card Movement
Card movement rules automatically perform actions whenever a card moves to a specific list.
Step 1: Open the Automation Menu
Open your Trello board and click Automation from the top menu.
First click here
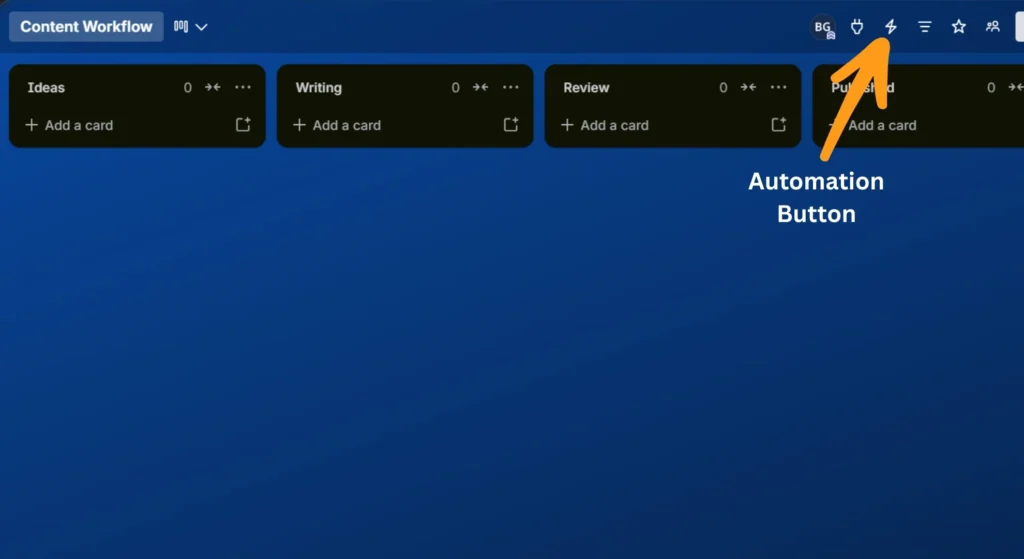
Automation menu will appear then

Step 2: Create a New Rule
Select Rules and click Create automation button with blue background.

Step 3: Choose the Trigger
Select the trigger:
When a card is moved to a specific list
Choose the Done list.
First go here

Then it will appear this below window

Step 4: Add Your Actions
Configure these actions:
- Add the Complete (green) label.
- Remove the In Progress label.
- Move the card to your archive-ready position (optional).


Step 5: Save and Test the Rule
Click Save.
Now drag a card into the Done list.
The automation should:
- Add the green label.
- Remove the old label.
- Organize the card automatically.

Rule Type 2 – Trigger by Due Date
Due date rules automatically highlight tasks that need attention.
Step 1: Create a New Rule
Go to Automation → Rules → Create Rule.
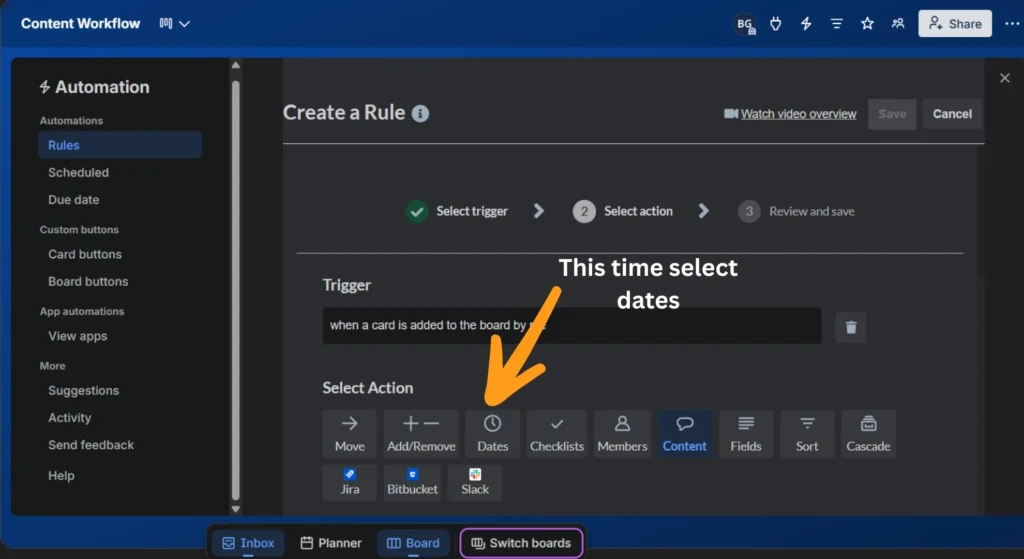
Step 2: Choose a Due Date Trigger
Select one of these options:
- When a due date is coming up
- When a card becomes overdue
For this tutorial, choose:
When a card is marked overdue

Step 3: Add Automation Actions
Configure the rule to:
- Add the Overdue (red) label.
- Post a comment mentioning the assigned member.

Step 4: Save and Test
Save the rule.
Create a card with a past due date to test it.
When the due date passes, Trello automatically:
- Adds the red label.
- Posts the reminder comment.
Rule Type 3: Trigger by Checklist Completion
Checklist automation is useful for approval workflows and multi-step projects.
Step 1: Create a New Rule
Open:
Automation → Rules → Create Rule
Step 2: Choose the Trigger
Select:
When the last item on a checklist is checked

Step 3: Add Automation Actions
Configure the rule to:
- Move the card to Ready for Client Review.
- Add the assigned reviewer.
Step 4: Save the Rule
Click Save.
Step 5: Test the Workflow
Complete every checklist item on a card.
Once the final item is checked, Trello automatically:
- Moves the card.
- Assigns the reviewer.
Rule Type 4: Card Creation Defaults
This automation prepares every new card automatically.
Step 1: Create a New Rule
Go to:
Automation → Rules → Create Rule
Step 2: Choose the Trigger
Select:
When a new card is added to a list
Choose your working list.
Step 3: Configure Default Actions
Set Trello to automatically:
- Add a default label.
- Assign a team member.
- Set the due date to 5 days after creation.
Step 4: Save the Rule
Click Save.
Step 5: Test the Automation
Create a new card.
You’ll notice that Trello automatically:
- Adds the label.
- Assigns the member.
- Sets the due date.
Rule Type 5: Scheduled (Calendar) Commands
Calendar commands automatically create recurring tasks on a schedule.
Step 1: Open Calendar Commands
Go to:
Automation → Calendar Commands
Step 2: Create a New Scheduled Command
Click Create Command.
Step 3: Set the Schedule
Configure the schedule:
- Every Monday
- 9:00 AM
Step 4: Choose the Action
Create a new card named:
Weekly Priorities Review
Place it in your first list.
Step 5: Save the Command
Click Save.
Step 6: Verify the Automation
Every Monday at 9:00 AM, Trello automatically creates a new Weekly Priorities Review card without any manual work.
Watch this guiding video if you are still struggling.
Comparing Automation Types by Use Case
| Automation Type | Best For | Setup Difficulty | Time Saved Weekly |
|---|---|---|---|
| Card Movement Rules | Workflow consistency (status updates) | Low | 15–20 min |
| Due Date Rules | Deadline visibility, avoiding missed work | Low | 10–15 min |
| Checklist Triggers | Multi-step approval or QA processes | Medium | 10–15 min |
| Card Creation Defaults | Reducing setup time on new tasks | Low | 10–20 min |
| Calendar Commands | Recurring reminders and reviews | Medium | 15–25 min |
| Button Automations | One-click multi-step actions | Medium | Varies — high impact |
If you only build one type this week, start with Due Date Rules, they require the least setup and immediately reduce the mental load of tracking deadlines manually.
One More Powerful Option: Custom Buttons
Beyond automatic rules, Butler lets you build custom buttons, either on individual cards or across the whole board, that trigger a sequence of actions with a single click.
Example: a “Mark Reviewed” button on a card that simultaneously adds a “Reviewed” label, moves the card to the next list, adds a comment, and removes the assigned reviewer while adding the next person in the workflow. Four actions, one click, instead of four separate manual steps every time a review happens.
Board buttons work the same way but apply to a card you select rather than being embedded on every card, useful for actions you take often but not on a fixed trigger, like “Escalate to Urgent.”
Mistakes That Undercut Automation (Fix These First)
- Automating before defining a clear manual process. If your team doesn’t agree on what “Done” or “Overdue” means yet, automating around inconsistent definitions just automates the confusion faster.
- Building too many rules at once. Setting up ten automations in one sitting means you won’t remember what triggers what when something behaves unexpectedly. Start with two or three, confirm they work as intended, then add more.
- Ignoring the monthly run limit on the free plan. Heavy automation use across a busy board can hit the free tier’s monthly cap faster than expected. Check your usage under board settings before assuming every rule will run indefinitely.
- Creating conflicting rules. Two automations that both try to move the same card under different conditions can create a loop or unpredictable behavior. Review your rule list periodically to catch overlaps.
- Automating actions that need human judgment. Not everything should run automatically, a rule that auto-assigns members based only on card movement can misfire when the actual right person for a task varies. Keep judgment calls manual.
- Never testing a rule before relying on it. Create a test card and run the automation on it before trusting it with real project data. A misconfigured trigger can silently mess with cards for weeks before anyone notices.
- Forgetting rules exist and duplicating manual work anyway. Some teams build automations, then keep doing the manual version out of habit. Document your active rules somewhere visible so people trust and use them instead of second-guessing.
A Small Design Team’s Before and After
A five-person design studio used one Trello board to manage all client requests. Before automation, their process leaned entirely on manual habits: someone had to remember to label new cards, move things to “In Review” when design work finished, and manually check for overdue items every Friday.
After building four automations, a card creation default rule, a due-date overdue flag, a checklist-completion move to “Client Review,” and a weekly recurring “Priorities Review” card, their Friday board-cleanup ritual, which used to take close to 40 minutes, dropped to under 10. More importantly, overdue items stopped slipping through unnoticed, because the red flag appeared the moment a deadline passed instead of during a weekly manual scan.
Nothing about their creative process changed. The board just stopped requiring constant manual upkeep to stay accurate.
Get Trello templates from here
Pro Tips for Getting More Out of Butler
- Use the Butler “test” feature before going live. Every rule has a preview option that shows you what would happen without actually executing it, use this to catch mistakes before they touch real cards.
- Combine due date automation with calendar commands for a full weekly rhythm: a Monday “Plan the Week” card creation paired with a Friday “Review Overdue Items” automated check creates bookends around your week without manual scheduling.
- Name your rules descriptively. “Rule 4” tells you nothing six months later. “Move to Review on Checklist Complete” tells you exactly what it does at a glance.
- Audit your automations monthly. Boards evolve, a rule built for a workflow that changed two months ago might now be doing something unhelpful. A five-minute monthly check keeps automations aligned with how you actually work now.
- Use board buttons for judgment-based actions, and automatic rules for pure logic. If a human needs to decide whether something applies, use a button. If it’s a fixed condition every time, automate it fully.
Learn Trello keyboard shortcuts to ease your work
Frequently Asked Questions
- Is Trello automation really free, or is it a paid feature? Butler automation is included on Trello’s free plan with a monthly limit on the number of automation runs. Most individuals and small teams stay well within that limit; larger teams running heavy automation may need a paid plan for higher run allowances.
- How many automation rules should one board have? There’s no fixed number, but somewhere between 4 and 8 well-defined rules typically covers most workflows without becoming difficult to track. More than that, and it’s worth documenting them somewhere for team reference.
- Can automation move cards between different boards, not just lists? Basic Butler rules on the free plan work within a single board. Cross-board automation is more limited and typically requires additional Power-Ups or higher-tier plans depending on complexity.
- What happens if two automation rules conflict? Trello runs rules in the order they’re triggered, which can occasionally create unexpected results if two rules act on the same card simultaneously. It’s worth reviewing your rule list periodically to catch potential overlaps before they cause confusion.
- Do I need any coding knowledge to set up Butler automations? No. Butler uses a plain-language rule builder, you select triggers and actions from dropdown menus, no code required. It’s designed for non-technical users.
- Can automation send notifications outside of Trello, like to Slack or email? Yes, with the right Power-Up connected. Trello integrates with Slack, and card comments/mentions can trigger email notifications depending on your notification settings.
- How do I know if my board is using its automation limit efficiently? Check your board’s Automation usage under board settings, it shows how many runs you’ve used against your monthly allowance. If you’re consistently near the cap, consider consolidating rules or upgrading your plan.
- Will automating my board change how my team currently works? Ideally, automation should support your existing process, not force a new one. Build rules around what your team already does consistently, trying to automate a process that isn’t stable yet usually creates more confusion.
- What’s the easiest first automation for a beginner to build? A due-date overdue flag, automatically adding a red label when a card passes its due date. It requires minimal setup and delivers immediate, visible value.
- Can I undo or delete an automation rule if it’s not working as expected? Yes, rules can be edited or deleted anytime from the Automation tab without affecting existing cards’ current state. Deleting a rule only stops future automatic actions, it doesn’t undo past ones.
Where to Go From Here
Automation isn’t about making Trello feel more advanced for its own sake. It’s about removing the small, repetitive actions that quietly cost you time every single week without you noticing until it adds up.
Pick one rule from this guide, the overdue due-date flag is the easiest starting point. Set it up today, watch it work for a week, then add a second rule once the first feels invisible. That’s how automation actually sticks: one small, tested rule at a time, not an overnight overhaul of your entire board.